Battery switch on travel trailer function is crucial for managing your RV’s power. Understanding how these switches work – whether single, dual, or rotary – is key to safe and efficient power management. This guide breaks down everything you need to know, from location and operation to troubleshooting and maintenance, ensuring you’re prepared for any situation on the road.
We’ll explore different switch types, their pros and cons, and how they integrate with your trailer’s electrical system. Learn how to safely connect and disconnect batteries, troubleshoot common issues, and perform routine maintenance to keep your power system running smoothly. We’ll even cover upgrades and replacements to help you optimize your travel trailer’s electrical setup.
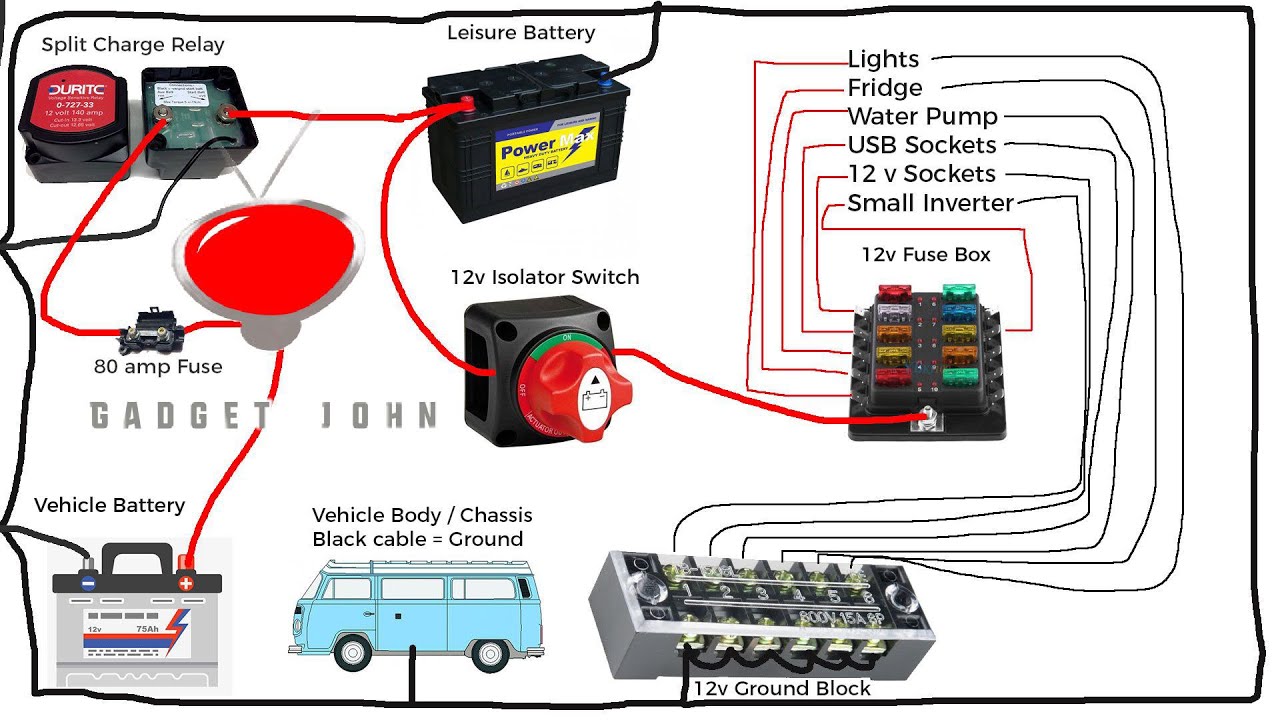
Battery Switch Types in Travel Trailers
Choosing the right battery switch for your travel trailer is crucial for managing your power sources efficiently and safely. Understanding the different types available will help you make an informed decision based on your specific needs and setup. This section details the common types, their pros and cons, and typical applications.
Single Battery Switches
A single battery switch is the simplest type, designed for use with a single battery. It’s a basic on/off switch that connects or disconnects the battery from the trailer’s electrical system. This is a good option for trailers with minimal electrical needs or those using only one battery for house power.
Dual Battery Switches
Dual battery switches allow you to manage two batteries independently. Commonly, one battery powers the house systems (lights, appliances, etc.), and the other is dedicated to starting the tow vehicle. This setup provides redundancy and ensures that your tow vehicle will always have power to start, even if the house battery is drained. Many dual switches offer a “both,” “battery 1,” “battery 2,” and “off” position, giving you complete control over power distribution.
So, you’re planning a trip? Awesome! Don’t forget travel insurance – it’s a lifesaver. Check out Aon travel insurance for comprehensive coverage. They offer various plans, so find one that fits your needs and budget. Then, once you’ve got that sorted, look into luxury options; Aon travel insurance also partners with some high-end travel agencies, so you can protect your fancy vacation too!
Rotary Battery Switches
Rotary switches offer more complex control over multiple batteries, often found in trailers with more extensive electrical demands or multiple battery banks. These switches usually have multiple positions, allowing you to select which battery or combination of batteries is connected to the trailer’s system. This flexibility is ideal for managing deep-cycle house batteries and starting batteries simultaneously or separately.
They can handle higher amperage loads compared to simpler switches.
Comparison of Battery Switch Types
| Type | Features | Advantages | Disadvantages |
|---|---|---|---|
| Single Battery Switch | Simple on/off control for one battery. | Simple, inexpensive, easy to install. | Limited functionality; only suitable for single battery systems. |
| Dual Battery Switch | Independent control of two batteries; typically includes “both,” “battery 1,” “battery 2,” and “off” positions. | Provides redundancy; allows separate management of house and starting batteries. | Limited to two batteries; may not be sufficient for complex systems. |
| Rotary Battery Switch | Multiple positions for controlling multiple batteries or battery banks; often handles higher amperage loads. | Versatile; allows complex control over multiple power sources; suitable for larger trailers with significant electrical demands. | More expensive; more complex installation; requires a good understanding of electrical systems. |
Battery Switch Location and Accessibility

Finding your battery switch quickly is crucial, especially in emergencies or when performing routine maintenance. A poorly located switch can turn a simple task into a frustrating and potentially dangerous ordeal. This section will explore typical locations and highlight the importance of easy access for safe and efficient operation.The location of your battery switch varies significantly depending on the manufacturer and model of your travel trailer.
Some manufacturers place the switch inside a convenient access panel near the entrance door, often alongside other electrical components. Others might tuck it away under a storage compartment, sometimes requiring you to crawl underneath the trailer to reach it. Still others might integrate it into a more centralized control panel, perhaps inside the trailer itself.
Typical Battery Switch Locations and Accessibility Issues
Common locations include interior compartments near the entry door, exterior compartments under the trailer, or within a central electrical panel inside the trailer. However, accessibility varies widely. Exterior-mounted switches, while potentially offering better ventilation, can be inconvenient or even dangerous to reach in inclement weather. Interior-mounted switches might be easy to reach but could be hidden amongst other components, making them difficult to identify.
Switches located under the trailer present the greatest accessibility challenges, requiring you to get on your hands and knees and potentially deal with uneven terrain, mud, or debris. Easy access is paramount for quick disconnection in emergencies like fire or accidental short circuits. Regular maintenance, like checking terminal connections, is also much simpler with a readily accessible switch.
Ideal Battery Switch Placement
Imagine an ideal placement: The switch is located in a weatherproof, easily accessible exterior compartment, positioned near the tongue of the trailer. This compartment would be clearly marked with a large, durable label that says “BATTERY SWITCH” in bold, high-visibility lettering. The compartment itself would be secured with a latch that’s easy to open even with gloved hands, and ideally, it would be mounted at a comfortable height, preventing unnecessary bending or stretching.
Inside, the switch would be clearly visible and well-lit, even in low light conditions. Wiring to the switch would be neatly routed and secured, preventing accidental damage or snags. The compartment would be well-ventilated to dissipate heat and prevent moisture buildup, thus enhancing the longevity of the switch and its components. The entire assembly would be securely mounted to the trailer frame, ensuring stability and preventing movement during travel.
This design prioritizes safety, ease of access for both routine maintenance and emergency situations, and the durability of the components themselves.
Battery Switch Maintenance and Upkeep
Keeping your travel trailer’s battery switch in top condition is crucial for reliable power and safe operation. Neglecting maintenance can lead to frustrating breakdowns and potentially dangerous situations. A simple maintenance schedule can prevent these issues and extend the lifespan of your switch.Regular inspections and cleaning are key to ensuring your battery switch functions correctly and safely. A malfunctioning switch can lead to power loss, battery damage, or even electrical fires.
Therefore, proactive maintenance is a small investment with significant returns in terms of peace of mind and operational reliability.
Battery Switch Maintenance Schedule, Battery switch on travel trailer function
A simple, yearly maintenance schedule will keep your battery switch running smoothly. This schedule includes both visual inspections and hands-on cleaning. More frequent checks might be necessary in harsh environments, such as those with high humidity or significant dust.
Planning a trip? Don’t forget travel insurance! Check out aon travel insurance for comprehensive coverage. They offer various plans, so you can find one that fits your needs and budget. Seriously, it’s a lifesaver if something unexpected happens. And for those luxury getaways, consider exploring aon travel insurance options specifically designed for high-end travel.
Peace of mind is priceless, right?
- Annual Inspection: Visually inspect the switch for any signs of corrosion, loose connections, or damage to the casing. Check for any unusual heating or burning smells. Also, verify the switch operates smoothly in both the “on” and “off” positions.
- Cleaning: Use a wire brush or sandpaper to gently remove any corrosion from the terminals and switch contacts. Be careful not to damage the switch components. After cleaning, apply a thin layer of dielectric grease to the terminals to prevent future corrosion.
- Tightening Connections: Ensure all connections are tight. Loose connections can lead to arcing and overheating, potentially causing damage to the switch or even a fire.
Signs of Battery Switch Malfunction
Several signs can indicate that your battery switch needs attention. Recognizing these symptoms early can prevent more significant problems.
- Intermittent Power: If you experience sporadic power outages in your trailer, the battery switch may be the culprit. This could be due to loose connections or internal switch failure.
- Unusual Heating: If the battery switch feels unusually hot to the touch, this is a serious warning sign indicating a potential short circuit or other internal problem. Immediately disconnect the switch and seek professional assistance.
- Corrosion: Visible corrosion on the terminals or switch casing is a clear indication of a problem. Corrosion can impede electrical flow and eventually lead to complete switch failure.
- Difficult Operation: If the switch is difficult to turn or feels “sticky,” it could be due to corrosion or mechanical wear. This requires cleaning and potentially replacement.
Battery Switch Replacement or Repair
If you notice any of the signs mentioned above, you may need to replace or repair your battery switch. Minor corrosion can often be addressed with cleaning, but significant damage or persistent problems usually warrant replacement. If you’re not comfortable working with electrical systems, it’s best to consult a qualified RV technician. Replacing a battery switch involves disconnecting the battery cables, removing the old switch, and installing a new one, ensuring all connections are secure and properly insulated.
Failure to do so correctly can lead to electrical hazards.
Battery Switch Upgrades and Replacements
Upgrading your travel trailer’s battery switch can significantly improve its functionality and longevity. A more advanced system offers better control, protection, and potentially increased capacity for future additions like solar panels or larger batteries. Replacing an old or faulty switch is crucial for maintaining the safety and reliability of your electrical system.Choosing the right replacement or upgrade depends on your current setup and future needs.
Consider the amperage rating, the number of batteries you’re managing, and the types of connections available. Proper selection ensures seamless integration with your existing wiring and prevents damage to your electrical components.
Selecting a Compatible Replacement Battery Switch
When selecting a replacement, the most critical factor is the amperage rating. This rating must match or exceed the amperage of your existing system. A lower rating will overload the switch, leading to overheating and potential fire hazards. You should also verify the number of battery posts on the switch matches your current configuration (typically two for a dual-battery setup).
Ensure the physical dimensions and mounting style are compatible with your existing installation. Finally, consider the type of terminals—some switches use standard screw terminals, while others use quick-connect terminals.
Comparing Battery Switch Brands and Models
Several reputable brands offer high-quality battery switches for RVs and travel trailers. Examples include Blue Sea Systems, Perko, and Switchcraft. These brands vary in features, pricing, and durability. Blue Sea Systems, for instance, is known for its robust construction and innovative features like illuminated switches and integrated circuit breakers. Perko offers a wide range of switches suitable for various applications, from simple dual-battery switches to more complex systems.
Switchcraft provides reliable, long-lasting switches that are often chosen for their straightforward design and affordability.When comparing models, pay close attention to the amperage rating, the number of batteries it can handle, and any additional features like built-in fuses or circuit breakers. Some higher-end switches offer remote control capabilities, allowing you to manage your battery banks from inside your RV.
Consider the type of mounting (surface mount vs. panel mount) to ensure compatibility with your existing installation. Read reviews from other RV owners to get a sense of real-world performance and reliability.
Upgrading to a More Advanced Battery Switch System
Upgrading might involve transitioning to a system with higher amperage capacity to accommodate additional power demands. For example, adding solar panels might require a higher amperage switch to handle the increased current. An upgrade could also involve switching to a more sophisticated system with multiple battery banks, allowing for separate control of house batteries and starting batteries, or incorporating features like automatic battery switching or remote monitoring capabilities.
This often requires more complex wiring and may necessitate professional installation. Before starting any upgrade, it is crucial to disconnect the battery and follow proper electrical safety procedures. Thoroughly research the new system’s requirements and ensure compatibility with your existing wiring and components.
Mastering your travel trailer’s battery switch is a vital skill for any RV owner. By understanding its function, performing regular maintenance, and knowing how to troubleshoot problems, you can ensure reliable power and a safe, enjoyable camping experience. Remember, a well-maintained battery switch is key to preventing frustrating breakdowns and maximizing your time on the open road. So, get familiar with your system, and happy travels!
General Inquiries: Battery Switch On Travel Trailer Function
What happens if I leave my battery switch on all the time?
Leaving your battery switch on constantly can drain your batteries, especially if you have parasitic draws (small electrical loads even when the trailer is off). This can lead to dead batteries and potential damage to your electrical system.
How often should I clean my battery switch?
Ideally, clean your battery switch at least twice a year, or more often if you notice corrosion or signs of wear. A simple cleaning with a wire brush and baking soda solution can prevent issues.
Can I use a multimeter to test the battery switch itself?
Yes, a multimeter can help you check for continuity and voltage across the switch terminals to verify it’s functioning correctly. Consult online resources or a wiring diagram for your specific switch.
My battery switch feels loose. Is this a problem?
A loose battery switch is a safety hazard and could lead to poor connections or even arcing. Tighten the switch securely or replace it if it’s damaged.
